Frequently Asked Question on the network and dissemination pages
Table of Content
- What are the goals of the network?
- How can I participate?
- How do you select alerts?
- I have registered, what should I do now?
- How do I select the alert to observe from the list?
1. What are the goals of the network?
The Gaia Follow-Up Network for Solar System Objects (Gaia-FUN-SSO) has been set up in the framework of a task (DU459) of the Coordination Unit 4 (Object processing) of the Gaia Data Processing and Analysis Consortium (DPAC). Its goal is to coordinate ground-based observations on alert triggered by the data processing system during the mission for the confirmation of newly detected moving objects or for the improvement of orbits of some critical targets. Gaia will scan the sky following a pre-defined scanning law and such ground-based observations are required to avoid the loss of newly detected Solar System objects and to facilitate their subsequent identification by the probe.
2. How can I participate?
If you have access to telescope time, and are willing to participate to the network effort, you should Register to the observing network. Note that the objects to be discovered in the course of the Gaia mission are expected to have apparent magnitude above V=18-19 as seen from the Earth, telescope aperture should therefore be larger than 50 cm at least. A field of view of at least several arcminutes is also recommended, as the area to search on the sky for each call for observations (i.e., each alerts) increase quickly with time, and is only seldom below 0.1 square degree. This network however needs a large geographical coverage: do not hesitate in contacting us if you are interested.
3. How do you select alerts?
The ESA astrometric mission Gaia, which started its operations in June 2014, is spinning like a top and is collecting the position and apparent brightness of all the sources on the sky, down to a visual magnitude of 20.7. The data are downlinked to Earth daily, and a initial treatment is ran by ESA. The sources that cannot be identified as stars owing to their apparent motion between subsequent observations are sent to CNES in Toulouse for a specific, daily, additionnal treatment.
The accurate position on sky of these sources is determined, and the different observations deemed to be linked with the same object are grouped together. Owing to the scanning law of Gaia, there are generally only two epochs, separated by about 2h. Each epoch can contain up to 10 positions of the object as it crosses the 10 columns of CCD on-board. These observations are not enough to define uniquely the orbit of the target around the Sun. The daily treatment chain thus search for possible orbits consistent with the observations. A set of 2000 orbits is drawn, and used to predict the area within which the target lies on the plane of the sky as seen from the Earth. Indeed, owing to its location at the Lagrange L2 point, the parallax between Gaia and the Earth may be large, and close-by positions on sky as seen from Gaia can be spread as seen from the Earth. If a target is deemed observable (area small enough, solar elongation large enough, etc.) an alert is released. That is, information on the target, and its ephemerides, become available on present pages.
4. I have registered, what should I do now?
The computation of ephemerides requires to know where you are located on Earth. Also, the system will propose to you only the "best" alerts: those that you can observe from your location, given your instrumentation. This is why the first thing to do once you have registered (use this form ) is to define your device: telescope location and observability preferences. To do so, open your Settings in the top menu (Figure 1).

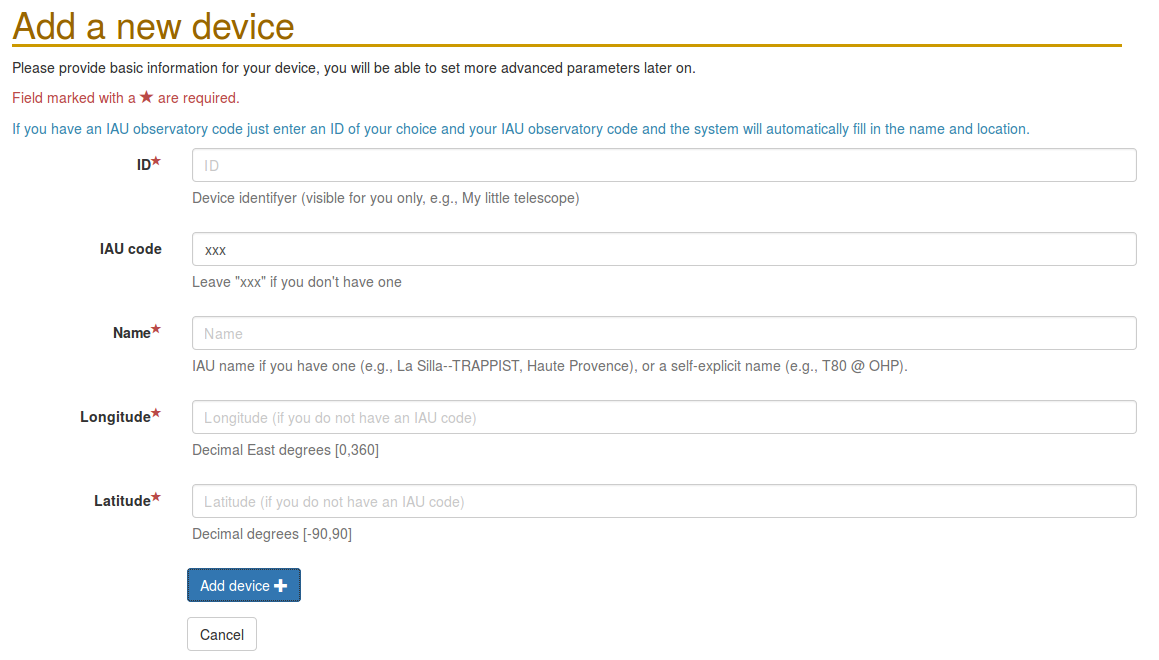
In the settings section (Figure 2), you will be able to manage your devices (add a new device, edit already existing device, de-activate a device you do not use anymore), and to update your personal information (email contact, institution, password). The first time you connect, simply push the Add a new device button to open the device definition area (Figure 3).
Figure 2: Your settings page. On the left, you can manage your devices, on the right,
your personnal information.

Figure 3: The page to define a new device.
If you have an IAU code, simply fill it, the service will automatically retrieve
your geolocation. Otherwise, please fill your longitude and latitude.
You can now go to the alert page, or set further details on the next
page (see XXX below).
5. How do I select the alert to observe from the list?
Our system can only assist you in choosing what to observe. The final decision is, of course, yours. The system lists on the Alerts page only those that are observable from your location, and within your criteria of observability (mainly apparent magnitude and maximum extent of the search region on the plane of the sky. These criteria can be changed in your Settings. Note that if the alert selection is done on the fly, ephemeris computations are done only once, upon reception of Gaia data, to avoid computation overloading. If you define a new device (i.e., a new geolocation), it is therefore likely that no alerts will be proposed to you until the next batch of Gaia data is received (in operation, this should be done on a daily basis).
We can recommend you to concentrate on the most recent alerts, for which the angular extent of the search region on the plane of the sky will be smaller (Figure 4). We also recommend to focus first on alerts easily observable with your device. The typical diameter of an asteroid discovered by Gaia or within the course of GBOT observations is of a couple of km only. These objects are known to present large amplitude lightcurves. A difference of 0.5 magnitude with what we report is therefore not unlikely. Alerts at the verge of your limiting apparent magnitude may therefore remain out of reach for this reason.
Figure 4: Example of the typical view of the list of alerts.
Each column is sortable (click in column headers).
You can then choose an alert based on when it started (the more
recent the alert, the smaller the area on sky), or
the apparent magnitude.
Use the links
and
to report the result of an observation and to access to the details
of each alert (ephemeris, sky view, etc).
